Category: Soft Glass

  • How Unlimited Oxygen Transformed the Way I Learned to Blow Glass

    How Unlimited Oxygen Transformed the Way I Learned to Blow Glass

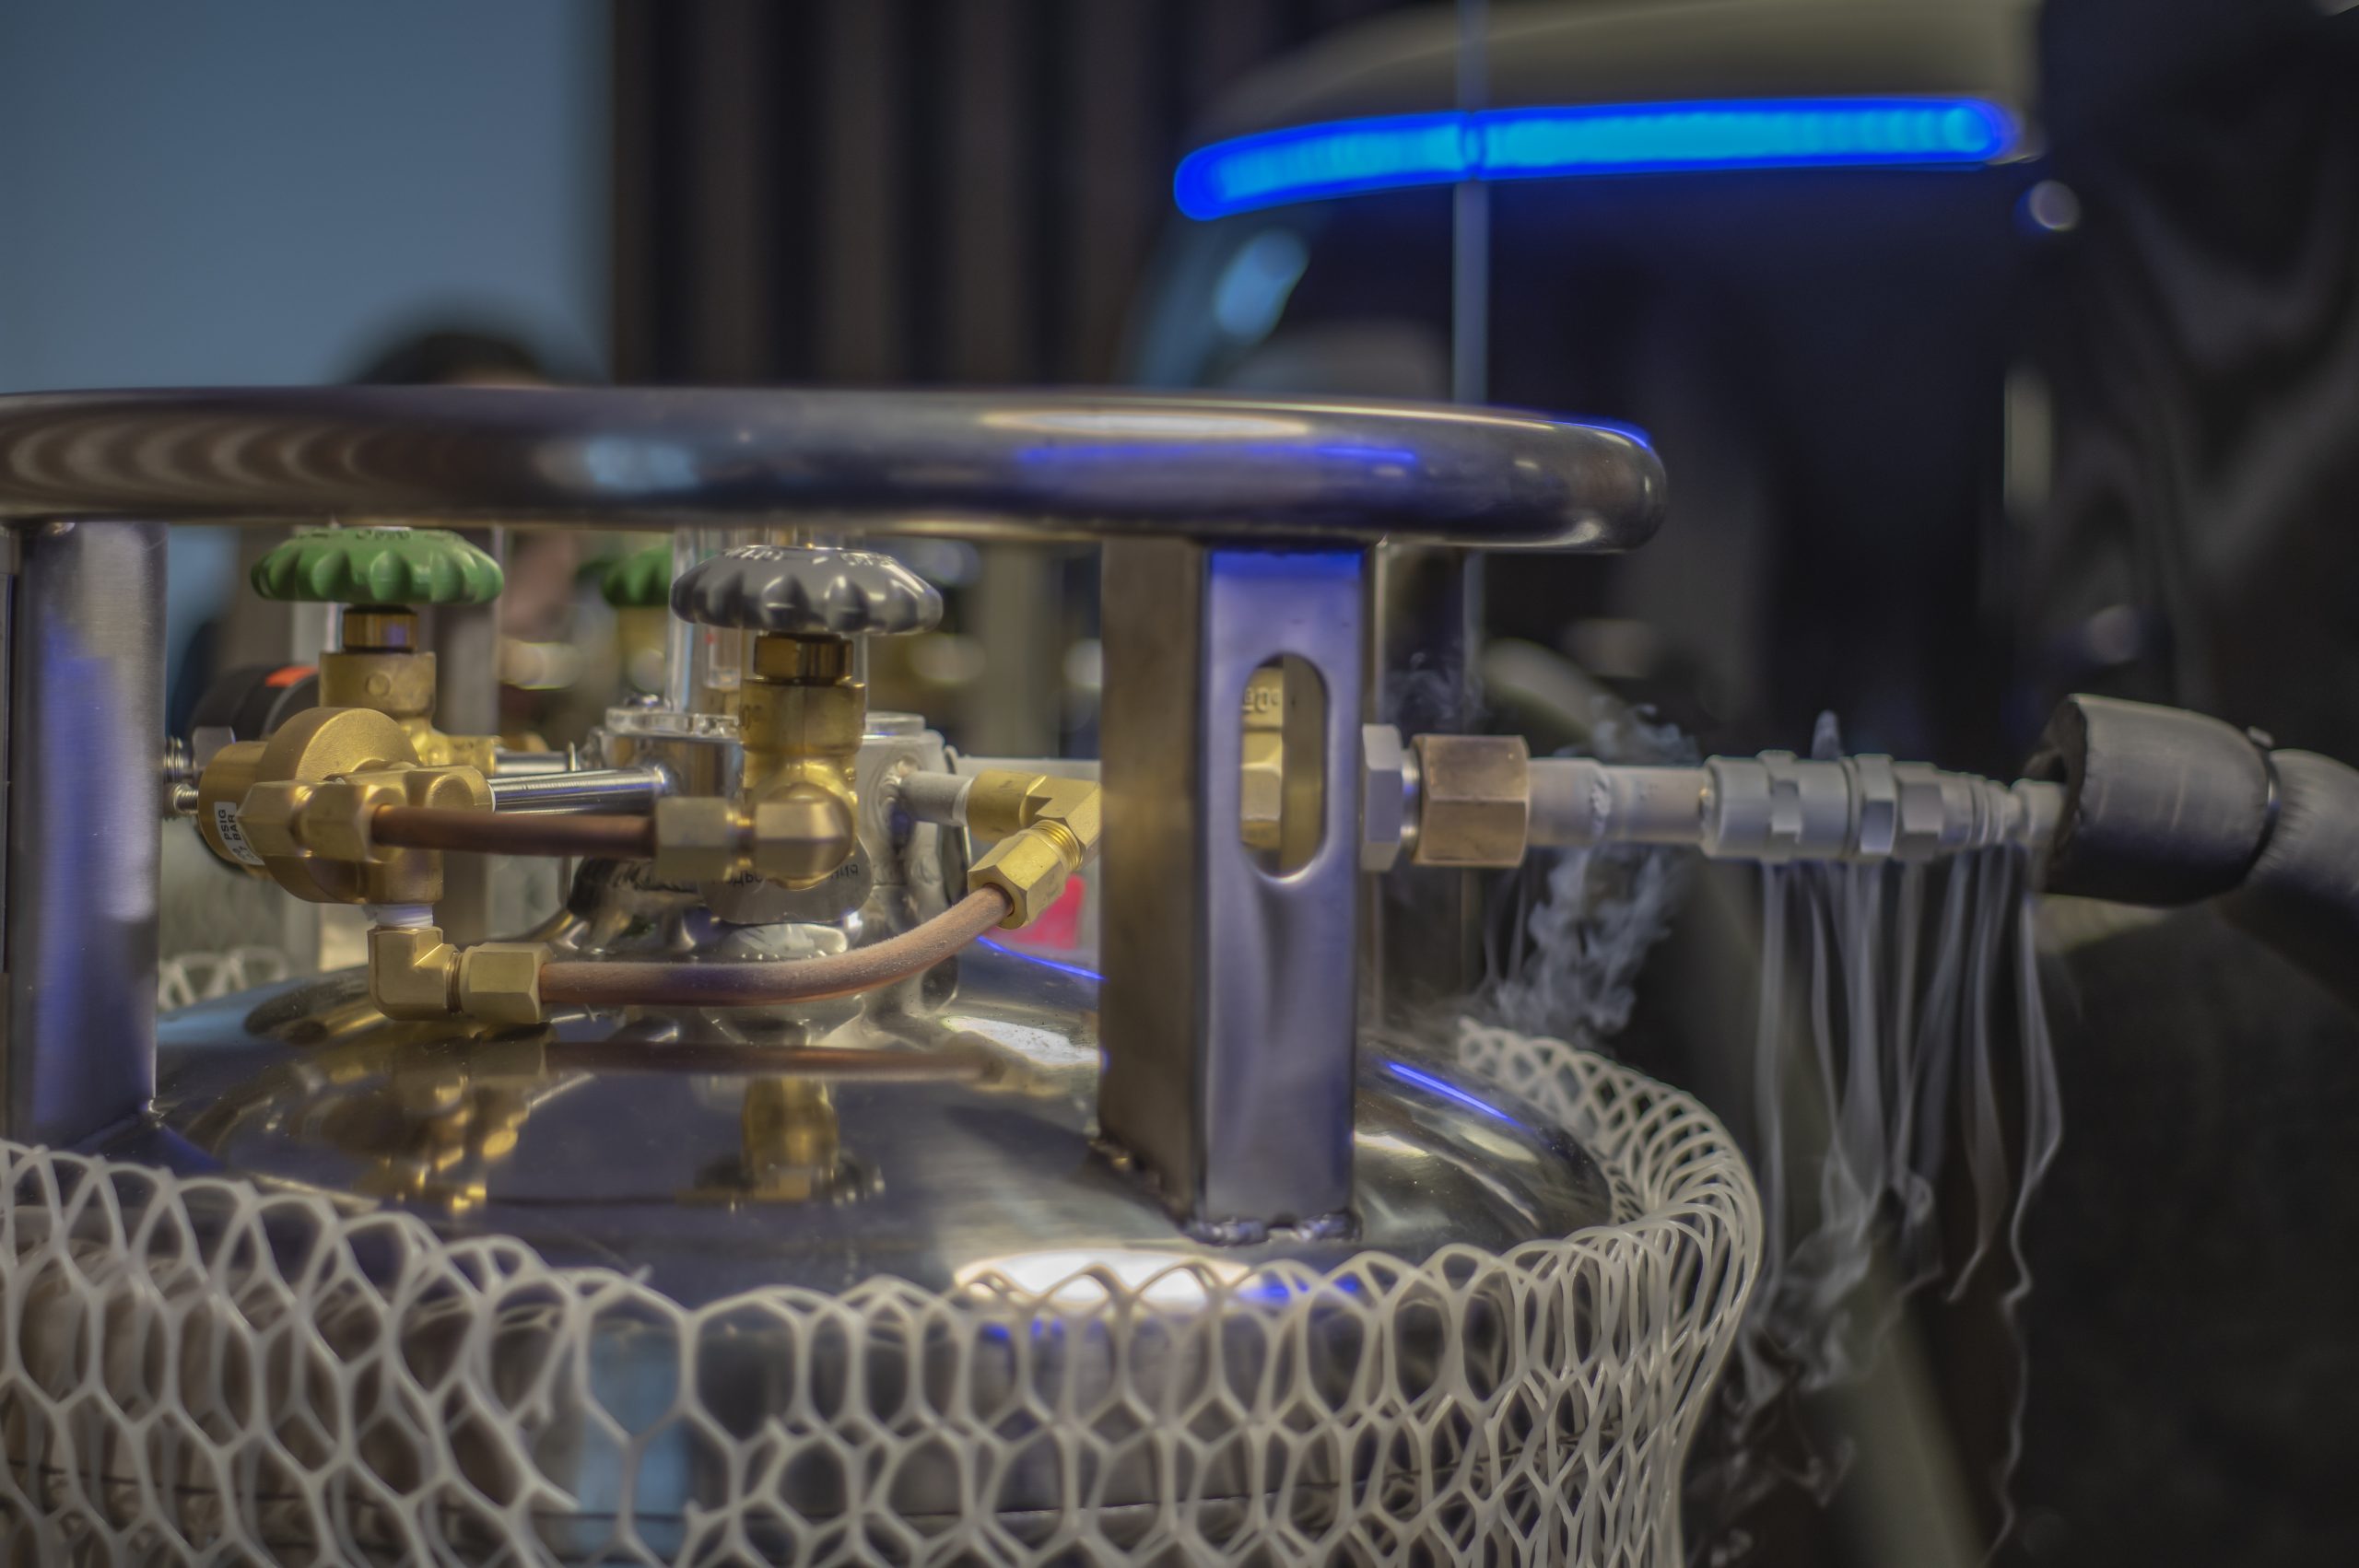
    My journey as a lampworker—and eventually the creation of Dylan Chris Glass—began in an unconventional way. I never once cracked open a tank of oxygen. From the very start, I built a DIY oxygen compression and control system based on an early Stage 2 prototype. That decision changed everything about how I learned, created, and grew as an artist..

    Breaking Free from the Oxygen Tank

    For many glassblowers, oxygen is one of the steepest recurring costs of the craft. A single K tank might only last a day at the torch, and refills can run over $70 each. Imagine trying to hone your skills or experiment creatively while watching those costs stack up day after day. It’s stressful, and it forces artists to ration their torch time.

    I never had to face that pressure. I didn’t need to count hours, worry about deliveries, or compromise my learning. Instead of carefully budgeting my time, I could fully invest it into my craft.

    Unlimited Time at the Torch

    Because my oxygen supply was functionally endless, I spent days on end practicing with cheap clear glass, building muscle memory, and experimenting without hesitation.

    “Every mistake became a lesson instead of an expensive setback. Every spark of inspiration could be followed instantly.” – Dylan Chris Glass

    That freedom to explore gave me the confidence needed to accelerate my growth as an artist.

    Creativity Without Limits

    When you don’t have to weigh the cost of every flame, you take more risks. I pushed myself to try new techniques, test ambitious designs, and refine my skills relentlessly. That freedom nurtured my creativity and allowed me to develop a style that wasn’t held back by the fear of burning through expensive tanks.

    The Business Advantage

    This didn’t just impact my artistry—it shaped my business. For over three years I worked full-time at the torch, supported by generated oxygen alone. Without constant oxygen bills cutting into my margins, I could price my work competitively without undervaluing my time or effort. The consistency of having oxygen on demand made my workflow predictable, efficient, and profitable.

    Dylan Chris Glass Section of Booth at the wholesale By-Hand Gift Show in Missisauga, ON.

    Always Ready for Inspiration

    The best part? Inspiration doesn’t follow a schedule. Whether it’s early morning or late at night, with a Stage 2 system, oxygen is always ready. There’s no waiting on deliveries, no stress about running low—just freedom to create whenever the spark strikes.

    In Conlusion

    “By starting with generated oxygen instead of tanks, I gave myself the chance to focus entirely on the craft. And that freedom changed everything.” – Dylan Chris Glass

    If you want to spend less time stressing about oxygen and more time building your skills and pushing your creativity, the Stage 2 System is the perfect addition to your studio!

    Check out the Stage 2 Models here!

  • How Much Oxygen Does a Soft Glass Bead Artist Use in a Day?

    How Much Oxygen Does a Soft Glass Bead Artist Use in a Day?

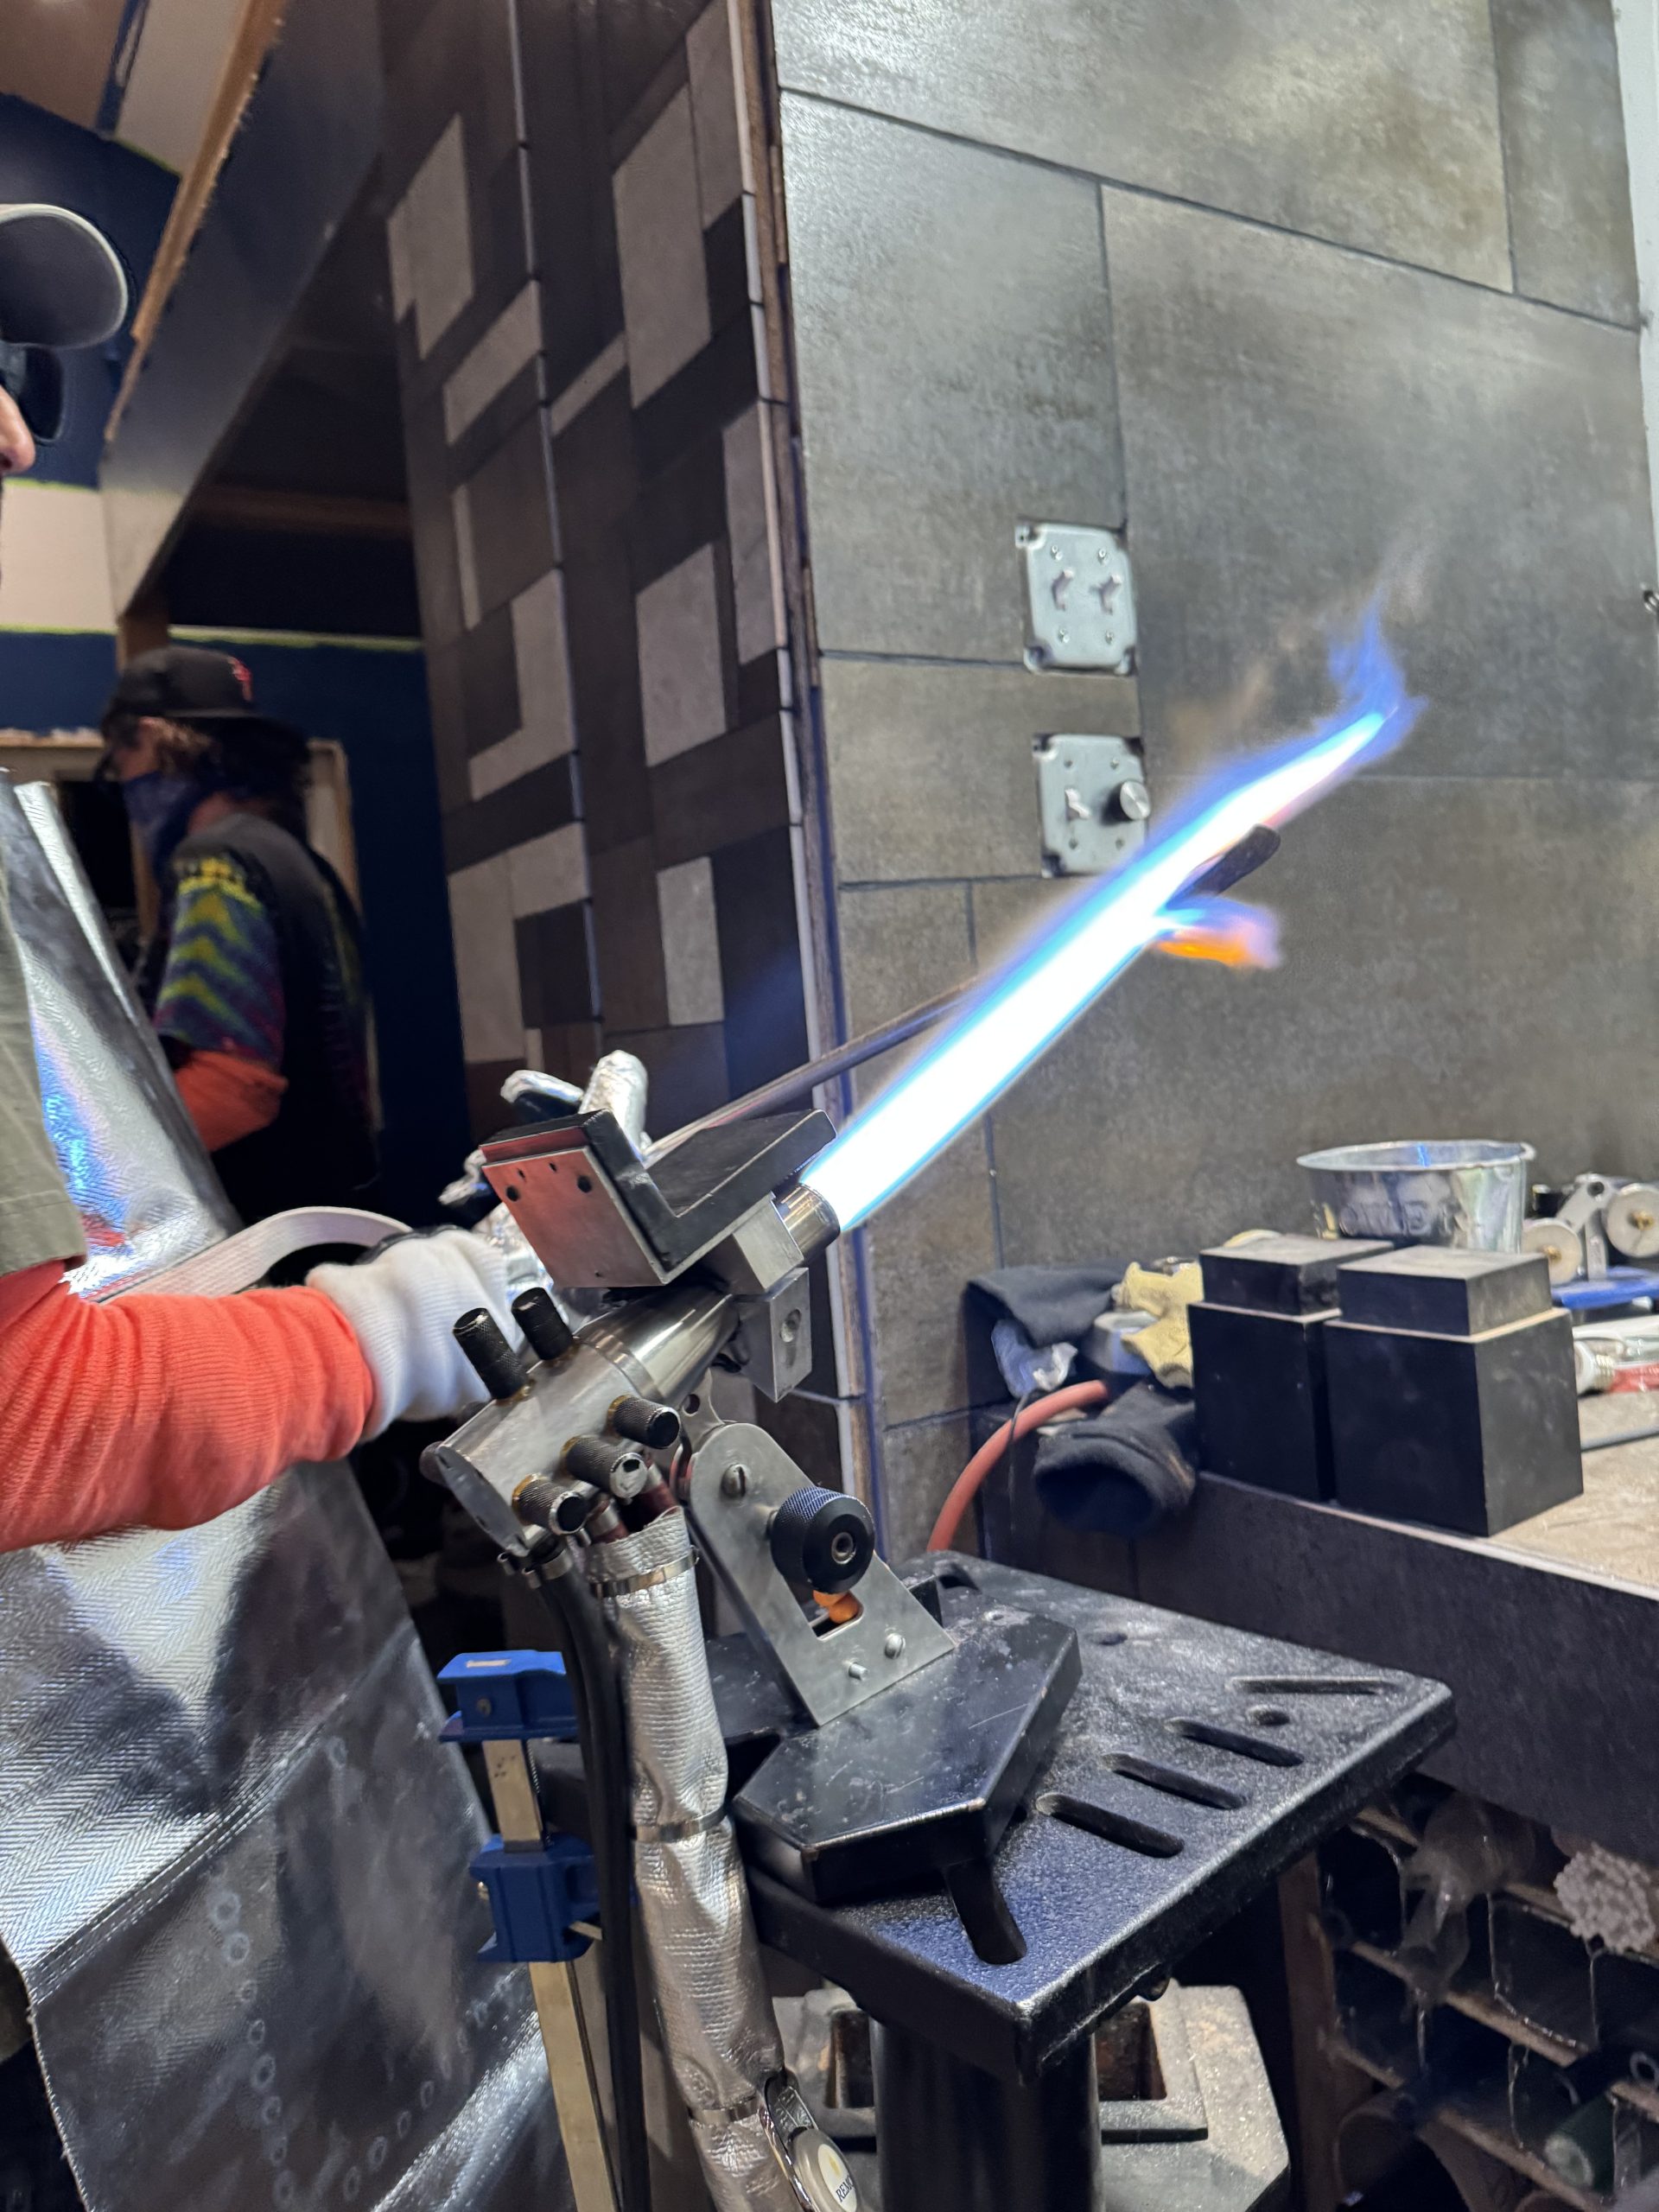
    If you’re a lampworker using soft glass to create beautiful beads, pendants, or ornaments, chances are you’ve wondered: How much oxygen am I actually burning through each day?

    Whether you’re using bottled oxygen, a concentrator, or a liquid oxygen setup, knowing your consumption helps with budgeting, studio planning, and maximizing your time at the torch.

    Let’s break it down.


    The Basics: Torches and Flow Rates for Beadmaking

    Soft-glass artists typically use mid-range torches like the Nortel Minor, Bethlehem Bravo, GTT Lynx, or National 8M. These torches require much less oxygen than the heavy hitters used for borosilicate work.

    Here’s a breakdown of typical flow rates:

    • Small flame (fine detail, stringer work): 2–4 liters per minute (LPM)
    • Medium flame (normal beadmaking): 5–7 LPM
    • Larger flame (larger beads or small sculpture): 8–12 LPM

    A common working flame is around 6 LPM for beadmaking.

    Example of medium to large soft glass lampwork, various beautiful colorful animal shapes.

    Burn Time: Real-World Studio Usage

    Most bead artists spend 2 to 5 hours at the torch in a session. Let’s assume 4 hours of active flame time during a day. You might spend time prepping rods, cleaning mandrels, or working at the kiln—but your oxygen is only used when the flame is lit.


    Oxygen Use in a Typical Day

    Let’s do the math using an average usage rate:

    • Flow rate: 6 LPM
    • Torch time: 4 hours = 240 minutes
    • Total oxygen used:
      6 LPM × 240 minutes = 1,440 liters of oxygen per day

    That equals 1.44 cubic meters, or about:

    • 50.9 cubic feet (cf) in standard U.S. units

    For comparison, a K-size oxygen cylinder holds about 244 cf, so one tank could theoretically last 4–5 days of beadmaking under typical conditions.


    Studio Tips for Oxygen Efficiency

    • Use a low, efficient flame for most beadmaking tasks. Soft glass melts at lower temperatures, so you rarely need large flames.
    • An oxygen concentrator (oxycon) is often ideal for bead artists. A unit producing ~10 LPM can keep up with most single-torch setups.
    • Check your flame balance—running a neutral or slightly reducing flame uses less oxygen than a roaring oxidizing flame.
    • Turn the torch off during breaks instead of leaving it idling.

    Summary

    FactorTypical Value
    Torch Flame Rate~6 LPM
    Burn Time per Day~4 hours (240 minutes)
    Daily O₂ Consumption~1,440 L (50.9 cf)
    Tank Usage Estimate1 K-tank = ~4–5 workdays

    Soft-glass beadmaking is a relatively low-demand discipline when it comes to oxygen, but understanding your usage can help you optimize costs and ensure you’re never caught without enough fuel to finish a project.

    Whether you’re just getting started or running a full-fledged lampworking business, knowing your oxygen footprint is a key step toward a smoother and more efficient studio experience.

    Ready to step-up your oxygen?

    Check out our Oxygen Runtime Calculator to know how long your torch could run on a Stage 2 paired with as few as one Stage 1 and a Storage Tank.

  • Understanding Studio Ventilation: A Practical Primer for Glassworkers

    Whether you’re new to torchwork or optimizing an existing studio, proper ventilation isn’t just a comfort issue—it’s critical to your health and safety. In a field where fumes, heat, and combustion byproducts are common, understanding how to design an effective ventilation system is non-negotiable.

    For years, Mike Aurelius’ Ventilation Primer has been recognized as a go-to reference in the art glass community—a foundational resource for anyone working with torch-based processes. This long-standing series, authored by a respected expert in lampworking safety, offers clear, actionable guidance on everything from airflow calculations to effective studio layout. Below, we highlight some of the core concepts—but for the complete technical deep dive, we encourage readers to consult the original Ventilation Primer.


    Why Ventilation Matters

    In torch-based work, harmful gases like nitrogen dioxide (NO₂) can build up quickly. Without effective airflow, these substances linger in your breathing zone, posing serious long-term health risks. A well-designed ventilation system removes fumes at the source and replaces them with clean air—protecting both you and your studio environment.


    The Core Concepts

    Mike Aurelius’s primer introduces several vital engineering principles, adapted for practical studio use:

    1. Airflow and Velocity

    To move toxic fumes efficiently, you need to create directional airflow at a specific speed—typically measured in feet per minute (FPM) and cubic feet per minute (CFM). Aurelius provides clear formulas:

    • CFM = Hood Area × Velocity × Efficiency Factor
    • Velocity Pressure (VP) = (Velocity ÷ 4004)²

    Understanding these values helps ensure your system has enough pull to capture the full fume plume from your torch.

    2. Sizing Your Ducting and Fan

    Duct diameter, length, and bends all affect resistance in your system. The primer offers step-by-step guidance for calculating static pressure losses—critical for choosing a properly rated fan that won’t underperform once installed.

    3. The Trouble with Overhead Hoods

    Many glassworkers use standard box-style hoods mounted overhead—but Aurelius explains why this setup often fails. Most suction happens directly at the duct opening, so if your hood is too large or the duct is too far from the source, fumes escape into the room. Alternatives like rear-wall or bench-level capture are more efficient for torchwork.


    Environmental Adjustments

    Operating at high altitude or in extreme temperatures? You’ll need to account for changes in air density. The series shows how to modify calculations for realistic pressure and airflow conditions, which can dramatically affect your system’s performance.


    Other Smart Design Tips

    • Make-up Air: Always ensure your ventilation system is pulling in fresh air to replace what’s being exhausted—especially if you work in a tightly sealed space.
    • Noise Management: Aurelius discusses techniques to reduce fan noise without sacrificing effectiveness, including fan placement and vibration isolation.
    • Cold Weather Strategies: In frigid climates, options like under-bench ducting help reduce drafts and keep workspaces comfortable.

    Final Thoughts

    Setting up effective ventilation doesn’t require an engineering degree, but it does demand some careful planning. This guide provides the foundation—calculations, design considerations, and troubleshooting—but the best results come from tailoring your setup to your specific space and work style.

    For full technical details, calculations, and diagrams, read Mike Aurelius’ complete Ventilation Primer. It’s one of the most comprehensive resources available for glassworkers and studio safety enthusiasts alike.

  • How Much is Your Oxygen Costing You?

    How Much is Your Oxygen Costing You?

    The cost of oxygen isn’t straightforward—it’s shaped by several variables:

    • Your location and gas provider
      Rates vary widely depending on your region and vendor.
    • Delivery setup and contracts
      Scheduled deliveries or annual agreements can slash per-unit costs.
    • Consumption type and volume
      Whether you need compressed cylinders, liquid oxygen (LOX), or use an on-site generator makes a big difference.

    To find the best value, begin by understanding how much oxygen you use and in what form.

    Option 1: Delivered Oxygen (Compressed or Liquid)

    Compressed Cylinders

    • A 300 cf (cubic-foot) tank can cost anywhere from $12 to $85, depending largely on delivery method and contract terms—this is a staggering and unpredictable price swing. 

    LOX Dewars

    • Liquid dewars (e.g., 180-cu-ft capacity) fetch around $200 each, which equals roughly 4,650 scf.
    • However, LOX tanks can “spoof” as much as 10 % of their volume per day through automatic pressure relief—a silent but real cost.

    Ongoing fees

    • Cylinder or dewar rentals, delivery charges, and hazmat fees add thousands annually.

    Option 2: On-Site Oxygen Generation (PSA Systems)

    By generating your own oxygen (e.g., with a PSA generator), you gain:

    1. Lower cost per kg of O₂ — about $0.07–$0.10 depending on system size.
    2. Safety and convenience — no more handling high-pressure cylinders or LOX tanks.
    3. Eco-friendliness — no cylinder contamination, no off-gassed LOX.
    4. Reliability — as long as there’s power, you won’t run out—vital when oxygen supports life-critical operations like animal care or aquaculture.
    5. Virtually zero waste — you generate only what you need, exactly when you need it.

    Limitations

    • PSA systems deliver 93–95 % purity—fine for most industrial uses but not for cases demanding 99.99 %, such as laser cutting.
    • They’re less cost-effective above roughly 10,000 scf/day—big consumers may still justify bulk LOX or cylinders.
  • How Much Oxygen Do You Use as a Glass Artist?

    How Much Oxygen Do You Use as a Glass Artist?

    Whether you’re melting soft glass into delicate beads or crafting heavy borosilicate pipes, knowing your daily oxygen consumption is critical. It affects your bottom line, informs studio setup decisions, and helps you avoid mid-project surprises. This guide breaks down typical oxygen usage for both soft glass and borosilicate artists, so you can plan with confidence. If you’re ready to crunch numbers, check out the interactive tool below:

    Torch Types and Typical Oxygen Flow Rates

    Your oxygen usage depends largely on the type of glass you’re working with and the torch you use.

    Soft Glass Beadmaking (Low Oxygen Demand)

    Used for: beads, pendants, small ornaments
    Common torches: Nortel Minor, Bethlehem Bravo, GTT Lynx, National 8M

    Flame SizeFlow Rate (LPM)
    Fine detail / stringer2–4 LPM
    Standard beadmaking5–7 LPM (avg: 6)
    Larger beads/small sculpts8–12 LPM

    Borosilicate Work (High Oxygen Demand)

    Used for: pipes, marbles, large tubes
    Common torches: GTT Phantom, Carlisle CC, Nortel Red Max

    Flame SizeFlow Rate (LPM)
    Detail work5–10 LPM
    Medium tubing/marbles15–25 LPM (avg: 25)
    Large tubing/seals30–50+ LPM

    Daily Burn Time: Realistic Studio Usage

    Even in a long studio day, your torch won’t run nonstop. Artists often break up their time with prep work, annealing, cleaning, and rest.

    Artist TypeAvg Torch Time per Day
    Soft Glass Beadmaker~4 hours (240 minutes)
    Borosilicate Artist~5 hours (300 minutes)

    Oxygen Usage Estimates

    Soft Glass Example

    • Flow rate: 6 LPM
    • Torch time: 4 hours
    • Daily oxygen use:
      6 LPM × 240 min = 1,440 liters = ~50.9 cubic feet

    A standard K-size cylinder (244 cf) lasts ~4–5 days at this rate.

    Borosilicate Example

    • Flow rate: 25 LPM
    • Torch time: 5 hours
    • Daily oxygen use:
      25 LPM × 300 min = 7,500 liters = ~265 cubic feet

    A single K-cylinder may not cover a full day. Many boro artists use oxygen concentrators or LOX dewars for this reason.

    Tips to Optimize Oxygen Efficiency

    • Use the right flame for the job – Don’t over-flame. Most tasks can be done with a smaller, more efficient flame.
    • Run a neutral or slightly reducing flame – Oxidizing flames burn more oxygen.
    • Turn off your torch during breaks – Idle flames = wasted fuel.
    • Use a flowmeter – Track actual usage and spot inefficiencies.
    • Batch your work – Group prep tasks to minimize high-flame time.
    • Invest in an oxygen generator – Especially useful for high-consumption setups.

    Summary Table

    FactorSoft Glass BeadmakingBorosilicate Pipework
    Typical Flame Rate~6 LPM~25 LPM
    Torch Time per Day~4 hours~5 hours
    Daily O₂ Consumption~1,440 L / 50.9 cf~7,500 L / 265 cf
    Tank Use Estimate1 K-tank = ~4–5 days1 K-tank = <1 day

    Understanding your oxygen usage isn’t just about numbers—it’s about creating a safer, more efficient, and more cost-effective studio. Whether you’re just starting out or refining a pro setup, estimating your oxygen footprint is the first step toward better planning.

  • Oxygen Concentrators: What They Are, How They Work, and How to Use Them Safely

    Oxygen Concentrators: What They Are, How They Work, and How to Use Them Safely

    What is an Oxygen Concentrator?

    An oxygen concentrator is a device that extracts oxygen from the surrounding air and delivers it in a concentrated form. Unlike oxygen cylinders, which store compressed gas, concentrators produce oxygen on demand using ambient air. This makes them a cost-effective and convenient solution for users who need a consistent and reliable oxygen source.

    These devices are used across various industries and applications—from high-altitude training facilities and wellness spas to workshops and aviation settings—anywhere where enriched oxygen may enhance performance, recovery, or air quality.


    A Brief History of Oxygen Concentrators

    The roots of oxygen concentration technology trace back to the 1970s, when the first units were developed as alternatives to bulky oxygen tanks. Initially used in clinical settings, the technology has since evolved into compact, portable, and user-friendly systems that serve a broad range of both medical and non-medical needs. Today’s models are highly efficient, offering steady oxygen output for extended use in diverse environments.


    How Do Oxygen Concentrators Work?

    Modern oxygen concentrators use a method known as Pressure Swing Adsorption (PSA) to separate oxygen from other gases in the air. Here’s a simplified breakdown:

    1. Air Intake: The machine draws in room air, which is composed of approximately 78% nitrogen and 21% oxygen.
    2. Compression: The air is compressed and directed through filters.
    3. Nitrogen Separation: The compressed air passes through a special material (usually zeolite) that traps nitrogen molecules.
    4. Oxygen Delivery: What remains is oxygen-enriched air—typically around 90–95% pure—which is delivered through a connected tube.
    5. Cycle Repeat: The unit then releases the captured nitrogen back into the atmosphere and repeats the process.

    Many concentrators use dual filtration chambers that alternate to allow for continuous, uninterrupted oxygen output.


    Using Oxygen Concentrators: What to Know

    Before Use

    • Choose the Right Unit: Select a model that suits your needs—portable options for mobility, or larger stationary units for higher output or longer runtimes.
    • Power Source: Ensure access to a stable power supply. Some models come with battery backup or DC power compatibility for mobile or off-grid use.
    • Setup Environment: Place the unit in a well-ventilated space to allow for optimal airflow and cooling. Avoid tight enclosures or storage areas.

    During Use

    • Ventilation is Key: Keep the intake and exhaust vents clear of obstructions like walls, curtains, or furniture.
    • Safety First: Do not use the device near open flames, flammable substances, or while smoking. Concentrated oxygen supports combustion.
    • Use Clean Accessories: Always use clean tubing and fittings to ensure high-quality output and device longevity.
    • Monitor Performance: Some units have alarms or indicators to alert you to flow interruptions, overheating, or power issues—pay attention to these.

    Maintenance and Care

    Regular maintenance ensures your oxygen concentrator performs efficiently and safely over time:

    • Clean the Exterior and Filter: Wipe down the unit regularly. Rinse or replace external air filters as recommended by the manufacturer—often weekly or monthly.
    • Inspect Tubing: Check for kinks, cracks, or moisture buildup in the tubing and replace it as needed.
    • Check Humidifier Bottles (if used): Some applications use a water bottle to humidify the oxygen stream. Use only distilled or demineralized water and clean the bottle frequently.
    • Annual Servicing: For long-term users, consider having the unit inspected by a technician once a year to ensure internal components are functioning properly.

    Final Tips

    Oxygen concentrators offer a reliable, efficient way to deliver high-purity oxygen for a variety of non-medical applications. With no need for cylinder refills or heavy storage, they are ideal for continuous use in fitness, altitude, industrial, or wellness environments. By selecting the right unit and keeping up with routine care, users can enjoy consistent performance and long device life.

    If you’re looking to incorporate oxygen into your workspace, recovery center, or training setup, our team can help guide you to the right solution.